Blog & Engineering Insights
Payment fraud and cyber-attacks are what makes many people hesitant about going online and making purchases. In the B2B environment, this threat is even bigger, as we’re talking about large sums of money. Fortunately, Magento store owners can drastically increase the security of their platforms by installing the Magento 2 Stripe extension.
Stripe offers Payment Card Industry Data Security Standard (PCI DSS) security, being able to process transactions within seconds and come up with multiple security layers. In this post, I’d like to go deeper into the topic of installing the Magento 2 stripe extension.
Why should you go with the Magento 2 Stripe Extension?
There is no doubt that Stripe is a leading e-payment gateway provider, outperforming all of its competitors in terms of security and speed. This modern solution is considered to be one of the safest payment gateways available today, being superior to PayPal, Vapulus, 2Checkout, Authorize.net, WePay, and Amazon Payments.
Because Stripe is developer-friendly, it goes perfectly well for Magento, which is an open-source eCommerce store. Both of these platforms can be easily configured in order to meet the most stringent security needs. They both come with rich documentation and well-designed API in order to support a wide range of business models, from retail services and crowdfunding to subscription services and eCommerce.
Basically, Stripe is intuitive, very easy to use, highly customizable, and incredibly secure. Additionally, it streamlines the checkout processes, allowing users to save both time and money. To top it all, the Magento 2 Stripe extension comes with PCI compliance, which is the highest level of security compliance merchants can have.
Stripe accepts 135+ currencies and can be successfully used in over 25 countries. For EU businesses, Stripe comes with an SCA-ready policy, which makes it compliant with the upcoming PSD2 rules.
How to Install & Configure the Magento 2 Stripe Extension
The entire process is listed below:
1. Purchase the extension on the official store
2. Unzip it
3. Make sure your website has full access to the Magento directory and you can use the “cron” command.
4. Go to System > Tools > Web Setup Wizard, then click on the Extension Manager and let the installation complete
5. Run this command to finalize the Magento 2 Stripe extension installation:
bin/magento setup:upgrade
php bin/magento cache:flush
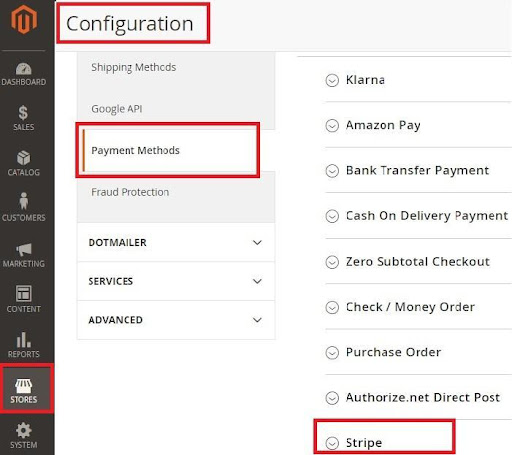
6. Log into the admin panel (or cPanel), go to Stores > Configuration > Payment Methods > Stripe

7. Create a Stripe account, register your account and get your own API key
8. Go to Developers > API Keys and get your own secret API key
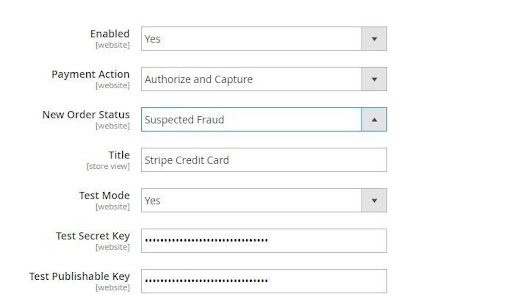
9. Access the backend of your Magento store and configure the extension

You can configure multiple features, including changing the currency and selecting the credit card types accepted. The payment for applicable countries is automatically set to “All Allowed”, but you can easily select only a group of countries that you want to accept the payment from.
In the configurations tab, you can also set up 3D secure, choose the minimum and maximum order value, sort the display order of the payment method, and perform numerous other operations.
Once you have finished the configuration of the Strip extension, simply click the Save Config button displayed in the top right corner and then check the information on your live checkout page.
Work with a Top Integration Partner
Many a time, installing the Magento 2 stripe extension becomes a complex task, especially when you encounter bugs or unexpected errors. Whatever eCommerce integration & implementation needs you might have, you can rely on us to help you out.